Tuesday, October 27, 2009

Paris-Brest : The Trip Not Taken


Remember my adventures with making chocolate éclairs? No? Well, I sure do. I had to go about making the pâte à choux twice because they just wouldn't rise in the oven. My aunt Mimi had whipped out her recipe and they were perfect in a flash.
That's why I thought a Paris-Brest would be extra easy. I was wrong.

This time around, I had the perfect pâte à choux recipe from last time and a nice-looking recipe for the filling. Simply put, a Paris-Brest is a classic French dessert. You start by making a ring with the dough, which you then bake until puffy and golden. Believe me, puffy may be a cute word, but it becomes terribly mean and sly at times. Anyway, you slice the ring in half and fill it with a mix of crème patissière and buttercream, flavored with pralin, a blend of sugar, ground hazelnuts and ground almonds. Sounds good, right? Trust me, it is. Or it should be, anyway.

I was totally excited about baking a Paris-Brest. I couldn't walk by a pastry shop without peeking in to take a look at theirs. It goes without saying that I won't be playing "Show me yours, I'll show you mine" with a Paris-Brest and pastry shops anytime soon. Oh, those golden, slivered-almond-topped cakes, sprinkled with confectioner's sugar... I knew mine would be just like them. I just know it. How couldn't it, given my great pâte à choux recipe?

I went ahead and got started on my Paris-Brest. Everything was going well, and my ring looked great even before baking, even though I couldn't find slivered almonds anywhere and sprinkled almond powder on top. I should have taken it as a sign to stop right there and come up with something else, but I kept going. In the oven, it looked wonderful. "Make sure you don't open the oven door", my aunt said. So I didn't open the door, and when my ring was nice and golden, I turned the oven off. I opened the door just slightly...and down it went. Pfiou, as the French say.


Pfiou, plop, wiz, whatever you want to call it, I was mad. Good thing I had a lot of pâte à choux left, and proceeded to start over again, using the leftovers to pipe tiny chouquettes onto a baking sheet alongside my new and, hoperfully, improved Paris-Brest ring. This time around, I settled on leaving the oven door closed and letting them cool little by little. Golden and puffy, everything looked amazing. I switched the oven off and waited. Ten minutes later...

Pfiou.

On the plus side, the filling I prepared while I watched the oven was great. Sweet, a little crunchy, and definitely tasty. Also, my Paris-Brest ring was a mess, but the chouquettes were a success. So I piped the cream into my floppy ring, just to say I actually did make that Paris-Brest, and piped the leftovers into a few chouquettes.

The Paris-Brest was alright--crème au praliné on five-day-old bread would probably taste good too--but I had just discovered something even better. Chouquettes au praliné. Who needs a Paris-Brest when you can have bite-sized tastes of heaven?


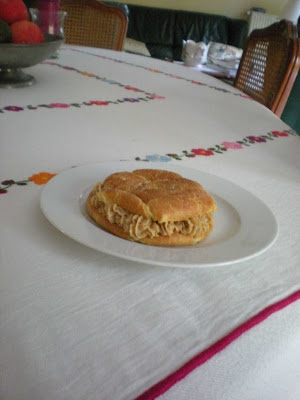
Yes, my Paris-Brest looked terrible. But isn't the best part of messing up discovering the little surprises hidden behind each failure?


Mimi's Pâte à Choux
Note: This makes a completely neutral dough--add some sugar or vanilla extract if you want it to be sweet


25cl water (I did half water, half milk)
60g butter
125g flour
4 eggs
Pinch salt

Bring water (or water + milk) to a boil in a saucepan.

Add butter and salt.

Sprinkle flour into saucepan, beating vigorously. On low heat, "dry" the dough out by beating it until it stops sticking to the pan. Remove from heat and add eggs one by one, mixing until well incorporated before adding the next one.


Paris-Brest
serves 2

Pâte à choux (approx. 1/4 of the recipe above, though I've never tried cutting it down)
8cl milk
1 egg yolk
40g softened butter
10g cornstarch
20g granulated sugar
40g powdered pralin

Bring milk to a boil. In a small bowl, beat yolk and sugar until light in color.

Add cornstarch, mix, and pour milk while beating everything together. Place in a saucepan over medium heat, beating until it starts to boil. Remove from heat and let cool.

Beat butter until fluffy. Add crème pâtissière (which you just made above), pralin, and beat on high if using a mixer.

Preheat oven to 180°C / 350°F.

Cover a baking sheet with parchment paper. Pipe pâte à choux, making 1 ring, then another right around it. Finally, pipe a ring on top of the last two. Decorate with slivered almonds. Bake 30 minutes until golden, and let cool with the oven turned off, door left slightly open. (Well, that's supposed to work...)

Once the ring has cooled, slice it in half and pipe praline cream onto the bottom half. Cover with top half, and sprinkle powdered sugar on top.


Alternative: Make as many chouquettes as you want by piping small (about 2cm in diameter) balls of dough onto a baking sheet. Decorate with pearl sugar or slivered almonds. Bake 20 minutes at 180°C, or until golden. Cool using the same method as above.
Using a serrated knife, slice the chouquettes open halfway and pipe as much cream as you want inside.

Eat and enjoy!


Monday, October 26, 2009

Lebkuchen, or the Cookies I'll never make on my own


I know it's only October and even Halloween hasn't come and gone, but once I get into the fall state of mind, all I can think about is the holiday season.


"Holiday" has a specific meaning for me--sure, I like Thanksgiving and all--but I'm mostly thinking about Christmas and that little day a month beforehand... my birthday. No, I'm no longer six years old or celebrating my sweet sixteen, but my birthday is admittedly my favorite day of the year. After October 20th rolls around, November 20th isn't far behind and I start getting into my own version of the holiday spirit.


When I'm in Saint Dié, not so far from the German border, this means indulging in feasts of gingerbread cookies dipped in hot chocolate milk. I'd love to tell you a story of how the recipe for these was passed down for generations and generations, but that's not how it goes. You know those German discount supermarkets like Lidl, Aldi, and Norma? That's where it all takes place. The earlier you go--end of October is perfect--the fresher these cookies are.


Covered in chocolate or thin sugary icing, they're called Lebkuchen and look somewhat like bells or Christmas trees. Some of them also have tiny colored sprinkles, and sprinkles have always had a strange appeal for me. All I remember from a long flight delay that got us stuck at the Chicago O'Hare Hilton when I was 5 is the donut with sprinkles I had at the hotel. I don't think I even liked donuts, but I sure liked sprinkles.


Anyway, these Lebkuchen signal the beginning of my favorite part of the year. And the ones we bought today were absolutely perfect and possibly the best I've ever had: moist, tasty, and colorful. They were as fresh as can be, and though I couldn't even wait to get home for the hot chocolate that usually goes along with it--the parking lot is a fine place for Lebkuchen--they were all I needed.


All I can say now is that Holiday Season, Lucie Version, looks like it's off to a good start.


P.S. : If you want to go ahead and make Lebkuchen, here's a recipe that looks nice.

Sunday, October 25, 2009

Grandma's Apple Crisp


If you're living in France, you've probably been hearing about les crumbles quite a bit for the past few years. It started out as a "girly" dessert, with summer berries and a light crunch. Then, they discovered that the crumble could be adapted to any type of fruit, and even any type of chocolate. It became a staple in all the little trendy restaurants, and has now established itself as a classic. It reminds everyone of simpler times, when nobody was fussing over raspberry tiramisus or the ever-too-present pannacotta. Not to mention the crazy verrine fad, where pretty much everything was served in miniature glasses for a year.

(Side note: I was stuck at the train station yesterday and spent a good half hour at the bookstore, looking at cookbooks. Pannacotta here, pannacotta there...Seriously?)
Anyway, this doesn't mean that an apple crumble doesn't hit the spot on a cool fall day. It's sweet, tastes like cinnamon, and with melt-in-your-mouth apples that are hard to resist. I really like apple crumbles, but what I love even more are apple crisps.

It's easy to get lost between crumbles, crisps, buckles, brown bettys, and the like. From what I've seen, a lot of people consider an apple crisp to have rolled oats, whereas a crumble does not. Hmm. I think everyone probably has a different definiton, and my American Grandma's apple crisp sure is different.

First of all, there are no rolled oats. Next, when you eat a crumble, you usually (well, I speak for myself here) don't feel really full unless you eat a lot of it, or unless you have way too much vanilla ice cream to go along with it. Yes, I am speaking from experience.

With my Grandma's apple crisp, you definitely feel full afterwards. Granted, this might be because it's hard to stick to only a few bites, but still. The topping is similar to the topping you would find on an American-style apple pie but with a lot more going on--a lot of cinnamon, some sugar, and a delightfully crisp top.

Just one bite sent me back to when I was ten and we would spend Thanksgiving in Maryland. If anyone is looking for a crazy moment, I'd say have some apple crisp, don't take drugs. Just one bite with some brown sugar whipped cream, and I was sent swirling into a mix of yellows, oranges and reds. Visions of jumping into leaves and having a cup of hot chocolate à la maison. The fact that I'm writing this bundled up in a huge sweater and sitting by the fireplace in Saint-Dié is clearly contributing. And maybe the fact that my Aunt just whipped up a batch of fresh applesauce.

In any case, if you're looking for a true experience that leaves you completely amazed by the powers of apples, sugar, and cinnamon, trust me: apple crisp is the way to go.


Tastier than it looks.
The picture speaks for itself: taking a picture of my crisp wasn't even on my mind until the last few bites. And, the apple crisp looks and tastes infinitely better than it seems to on the phone-camera picture--I swear.


Grandma Rose's Apple Crisp

Preheat oven to 350°F / 180°C.

Fill a 9x13 in. pan with peeled and cut baking apples. Add 1/2 cup granulated sugar, 2 TS cinnamon, 1/4 TS nutmeg and mix.

In a medium-sized bowl, mix 1 cup flour, 1/2 cup granulated sugar, 1/2 cup brown sugar, 3/4 TS salt, 1/2 TS baking powder, 1 egg, and a pinch of cinnamon. Spread on top of apples.

Melt 1/4 cup butter and pour over the entire pan. Bake for 20 minutes, and place under broiler for around 2 minutes, until slightly caramelized.

Serve warm with a scoop of vanilla ice cream or whipped cream.


Note: I made brown sugar whipped cream (beat 1/4 cup heavy cream with 1 TB brown sugar until soft peaks form), and I use Vietnamese Cinnamon which, if you can find it--mine is from TJ Maxx--has a strong, amazing flavor.

Thursday, October 22, 2009

Blondies, Cupcakes, and Fudge, Oh My!


You didn't seriously think I would only talk about the quiche and cake au chorizo I made the other day, and not the sweet part, did you?

My daddy was mentioning how it seems that the French attach a lot more importance to the difference between le salé and le sucré in a meal, and eating sweets before dinner, for example, is pretty uncommon. Even if I can eat any candy you want before dinner--I guess that's the American side of me--I do make a point to have both types represented when I cook for guests. Hey, my sweet and salty even get different tables in my teeny-tiny apartment.


Even though I love cooking main courses, the real fun always starts when I make dessert. This time around, I wanted to change things up and stray away from the temptation of my sour-cream chocolate cupcakes. They're so easy to make and super moist, but it was time to try something new. I was pretty disappointed with my red-velvet cupcakes when I first made them over a year ago, so I was determined to get them right this time around. And when it comes to getting a recipe right, the perfect thing to do is often to turn to Cook's Illustrated, or in this case the America's Test Kitchen Family Baking Book. The only thing I changed from the recipe was to add less food coloring--and obviously my cupcakes were less-than-red--but they were indeed delicious.

I also baked what I like to call my blondie, adding a little more butter than usual for a successful result. For once, I "only" had three bite-size blondie squares, explaining why there is finally a picture up.

Here it is!

Baking is like getting married: besides having something blue, it's nice to get a mix of novelty and tradition. In search of a petit plus, a little sweet something that would add to the cupcakes and blondies, I immediately thought of my Grandma's fudge. All that sugar, butter and chocolate is as retro as can be, but also completely addicting. Did I mention that I wanted all of my fudge squares to be, well, square? That meant cutting the edges off. And who was I to decide that the uneven, ugly edges should go in the trash? I found a better place for those, and I'm sure you can guess that it wasn't outside or in someone else's stomach. No way.


Now that my teeth are probably set to hurt indefinitely because of my sugar intake, here are my recipes.

Then maybe we can start a club for people who could eat sweets at any time of day, even if they're French. Don't even think about it if you're the reasonable type.


Blondies
(you can also find the lighter, chocolate-chip version here)

NB: adding more butter makes baking time a little longer, and also makes the blondies thicker.

6 TB melted butter
1/2 c. brown sugar
1/3 c. granulated sugar
1 cup flour
1 egg
1 TS vanilla extract
1 cup m&ms, or Smarties, depending on the country you're in and the supermarket you go to

Preheat oven to 350°F / 180°C.

Mix melted butter and sugars until smooth. Add egg and vanilla, and flour. Mix until just combined.

Add M&Ms and combine. Place in a 8x8 (for thick blondies) or 9x13 (what I have) pan lined with parchment paper. Bake for about 40 minutes or until a toothpick comes out with a few delicious blondie-pieces attached.

Let cool (if you can resist) and cut into small squares.


Red Velvet Cupcakes with Cream Cheese Frosting
makes 24 cupcakes

2 1/4 c. all-purpose flour
1 1/2 TS baking soda
pinch salt
1 cup buttermilk, room temp
2 large eggs
1 TB white vinegar
1 TB vanilla extract
2 TB natural cocoa powder
2 TB red food coloring
12 TB unsalted butter (1 1/2 sticks, or approx 170g), softened
1 1/2 c. sugar

For Frosting (this is my recipe, in grams)
300g (2 packs) "nature à tartiner", or St. Moret
1/2 c. confectioner's sugar
2 TB sour cream
2 TS vanilla extract, more if needed

Heat the oven to 350°F / 180°C.

Whisk flour, baking soda and salt together in a medium bowl. In another medium bowl, whisk the buttermilk, eggs, vinegar and vanilla together. In a small bowl, mix the cocoa and red food coloring together to a smooth paste.

In a large bowl, beat the butter and sugar together with an electric mixer on medium-high speed until light and fluffy, 3 to 6 minutes. Reduce the mixer speed to low and beat in 1/3 of the flour mixture, followed by half of the buttermilk mixture. Repeat with half of the remaining flour mixture and the remaining buttermilk. Beat in the remaining flour mixture until just combined. Beat in the cocoa mixture until the batter is uniform.

Give the batter a final stir with a rubber spatula to make sure it is thoroughly combined. Place 1/4 cup throughout each lined muffin tin and bake until a toothpick inserted in the center comes out with a few crumbs attached, 15 to 20 minutes. Let them cool in tins for 10 minutes, then transfer to a wire rack to cool completely.

Frosting: Beat all ingredients together until light and fluffy, adjusting sugar and vanilla to taste. Spread evenly on cupcakes or pipe.


Grandma's Fudge
I halved the recipe, making enough for a 9x13 rectangular pan and approx 30-40 bite-sized pieces

4 cups granulated sugar
1/2 c. butter (1 stick, or 113g)
1 can evaporated milk (lait concentré non sucré), 12 oz.
12 oz package of semi-sweet chocolate bits
Two 8 oz. Hershey Milk Chocolate Bars (I just went ahead and used Nestlé Dessert for the whole thing--if you've got better chocolate than Hershey's the fudge can only taste better!)
4 TB Marshmallow cream

Stir sugar, butter, and evaporated milk together and put on stove. Boil until soft ball stage (235°F) about 10 to 12 minutes. You will notice that it thickens.

Remove from stove and add chocolates; stir until blended.

Add Marshmallow cream for regular fudge (what I did) or...

Separate into two bowls. Add 2 large TB Marshmallow to one, and 2 large TB of peanut butter to the other.

Stir and put into 9x13 lightly greased pans. Cool in refrigerator, cut and serve.


Monday, October 19, 2009

A Party is Always a Good Excuse to Cook


Most people have parties when they have something to celebrate, or at least when they have a reason to. I basically function in the opposite way: I feel like cooking, so why not have a party?

This led me to organize a little get-together last weekend with a dozen friends--who don't only enjoy eating chewy chocolate chip cookies, mind you, so I had to be a little creative. But creative is good, and exactly what I was looking for.

Obviously, I started with the sweetest things--not a reference to this past Sweetest Day--cupcakes and the like. I wanted to have the usual cupcakes, and mark a change from the cookies I usually have alongside them. Oh, that was difficult. Saying no to my favorite cookies is never easy. That is, until the idea of replacing them with M&M blondies comes along. Add some fudge to that and it's pretty easy to fathom, actually.

Then came the hard part. How much will people want to eat? Will they have had dinner beforehand? With these questions in mind, I set out to make some easy to munch on, savory bites. This is hopefully the last time I use the term "savory", which for some odd reason really gets to me.

Anyway, I immediately settled, as usual, on what we call un cake in French, customized to meet my chorizo and sundried tomato cravings. A creamy quiche wouldn't hurt either, I decided, and a get-together isn't really one without any veggies. But veggies don't go without a dip, and that's when I remembered the out-of-this-world black bean and chipotle dip my Maman made at a neighborhood cocktail party when I came home to visit in June. Making it just made me want to make it again and again and again--it's like a funner party version of vegetarian chili, which is perfect for the upcoming cold fall days.

With my shopping list on hand and a clear idea of what my get-together would look like, I set about making all of this. Thursday afternoon and all of Friday went by in a flash, but it was all for a good cause...seeing friends and satisfying my cooking craving!

Here are the "savory" (I'm waiting for the annoying word police) recipes, more to come later on my sweet adventures...


Cake au Chorizo et aux Tomates Sechées

4 eggs
1/4 cup oil
1/2 cup dry white wine
2 cups all-purpose flour
1 pink bag of baking powder (11g, or approx 4 teaspoons I think?)
4.5 oz grated gruyère or emmental
1/2 of a full chorizo, skin removed and cut into thin slices
4 large sundried tomatoes, chopped
Pepper

Preheat oven to 180°C / 350°F.

Mix eggs, oil, wine, and a pinch of pepper together. Beat until frothy.

Add flour, baking powder, cheese, chorizo and sundried tomatoes. Mix until just combined.

Bake in a loaf pan for about an hour, until a toothpick comes out clean. Since the chorizo and sundried tomatoes give off oil, don't be alarmed if you see oil bubbling around the edges--it will stop doing it after a few minutes!


Two-Pepper Quiche

Note: You could make your own pâte brisée, and that owuld probably be even better, but using a prepacked pure butter pâte brisée from the grocery store was fine for me!

1 tart shell
1 red bell pepper, chopped
1 yellow bell pepper, chopped
1 TB butter
2 eggs
3/4 c. milk (skim is fine)
1 c. crème liquide, i.e. whipping cream
as much grated cheese as you want (I used around 1/3 c. emmental)
salt and pepper

Preheat oven to 370°F.

In a buttered tart pan, bake tart shell for 15 mins covered with parchment paper and pie weights.

Cook bell peppers in a pan on stovetop with 1/2 TB butter until softened, adding salt and pepper to taste.

Beat eggs, milk, cream, cheese, and any extra herbs you want to add.

Place bell peppers in tart shell, and cover with egg mixture. Bake 30 minutes, until golden.


Warm Black Bean & Chiptole Dip
serves 10-12

2 TB olive oil
2 med. tomatoes, cored and diced
2 TS salt
1 large yellow onion, diced
1 large clove garlic, minced
1 TB chili powder
2 15.5 oz cans black beans, drained and rinsed (I used red beans because black beans don't seem to exist over here)
2 canned chiptoles, minced + 3 TB adobo from can
3 TB cider vingar (or red-wine vinegar)
1 1/2 c. fresh corn (I used canned in a pinch)
1 1/2 c. grated Cheddar (I used Mimolette)
1 1/2 c. grated Monterey Jack (I used mozzarella...I know)
3/4 c. fresh cilantro

Heat oven to 425°F. Grease 1 1/2 Qt. baking dish with oil and line baking sheet with foil.

Set tomatoes in a colander and sprinkle with 1 TS salt.

Heat oil in large skillet over medium-high until simmering. Reduce to medium, add onion and 1 TS salt. Cook until softened, 4 to 6 minutes.

Add garlic and chili powder, cook 1 minute. Add half of the beans, the chipotle, adobo, and 3/4c. water. Bring to a boil.

Cook until liquid reduces by half, about 5 minutes. Transfer to food processor, add vinegar, and process until smooth.

Transfer to a large bowl. Add beans, tomatoes, corn, 1/2 of each cheese, and 1/2 c. cilantro. Mix and season to taste.

Transfer to a baking dish and sprinkle with remaning cheeses. Bake until cheese melts and browns around the edges, for around 15 minutes.

Sprinkle with remaining cilantro, serve with veggies and tortillas.

Sunday, October 11, 2009

Tarte au Citron

The tarte au citron is a dessert that seems totally simple at first glance. It's lemon curd on a sweet pastry crust. Easy does it, right?

Actually, not really.

A perfect lemon tart is tangy--tart, not to be redundant--but sweet, creamy but not overpoweringly so. The crust should come off as the perfect vehicle for the filling, bringing a nice buttery taste to the overall flavor. In that light, a perfect lemon tart is something hard to achieve.


After making Pierre Hermé's lemon curd for my macarons (right here), I wanted to give the tarte au citron a try. Anything lemon has always been a favorite of mine: lemon in perfume, lemon in candy, and did I mention lemon poppy seed muffins? My only issue with the Pierre Hermé recipe was the insane amount of butter. For macarons, where you've only got a small amount of curd in each, a lot of butter is good. For a whole tart? Not so sure. I browsed around and found a recipe that sounded nice on Saveur, and decided to adapt it to use the foolproof Pierre Hermé technique--rubbing the sugar and zest together really ups the lemon flavor.

My next little problem was with the crust. For sweet tarts, I've really become keen on making my own. French pre-made crusts are great for quiches and the like, but I wanted my crust to have that special something. However, my inexistant counter space makes it utterly impossible to roll out a crust. Actually, I don't even have a rolling pin--that's how impossible it is for me to do things like that in my crazy little kitchen. Was it possible to find a pâte sablée recipe that I could press into my tart pan? Actually, yes! Dorie Greenspan has a great recipe, and while it does necessitate a little space in a freezer (my freezer is sized like my kitchen, so that might eventually have become a problem), it's super easy to make.

My lemon tart recipe isn't one where you bake it all together. The filling and crust are made separately, and after a couple of hours in the fridge, the final result is pretty amazing. My tarte was tangy and creamy, just the way I wanted it to be. I think lemon tarts baked all together (by that I mean crust + filling baked at the same time) have more tang and less of the creamy consistency, so I'll have to give that a try next time. One of the high points was the crust: it complemented the filling really nicely and, I quote, "tasted like a sablé from Brittany". I'd say that's pretty good, isn't it?

But for now, my creamy tarte au citron was as yummy as could be. And isn't a slice of lemon tart kind of like having a last slice of summer?


Pâte Sablée : Sweet Pastry Dough
adapted from Dorie Greenspan

1 1/2 c. flour
1/2 c. confectioner's sugar
1/4 TS salt
9 TB very cold butter
1 large egg yolk

Pulse flour, confectioner's sugar and salt in a food processor.

Add butter and pulse until coarsely cut in.

Add egg yolk, pulsing for 10 seconds at a time until dough forms clumps and curds. At this point, the mixture starts to make a different sound in the food processor that you'll notice.

Knead dough, and press into a buttered tart pan. Cover and freeze for at least 30 minutes.

Preheat oven to 375°F. Press foil against crust, and bake for approximately 30 minutes until golden. Decrease baking time by 5 minutes if you'll be rebaking the crust afterwards.


Crème au Citron : Lemon Curd
makes 2 1/2 cups, or enough for a French-sized tart

4 egg yolks
2 whole eggs
3/4 c. sugar
2/3 c. fresh lemon juice
8g lemon zest (approx. 1 TB)
145g (10 TB) cold butter, cut into pieces

Rub zest and sugar together.

Mix lemon juice, sugar/zest, and eggs together in a heatproof bowl. Place it over a pan of simmering water.

Cook, whisking constantly, until a thermometer reads 75°C.

Remove from heat; when temperature comes back down to 60°C, incorporate butter and mix for 5 minutes.

Cover surface with plastic wrap and set aside to let cool.

Refrigerate up to 2 weeks. When ready to use, pour into baked tart shell and refrigerate for at least an hour before serving.

Saturday, October 10, 2009

Pulled Pork Sandwiches, or how I refuse to let Summer end

The weather has gotten chilly in Paris. Well, mostly rainy, but you can tell the colder days are coming. People will say that it's only normal for mid-October, but I'd rather side with all the other Parisians: as long as it's not snowing, you can still have dinner and drinks at a terrasse. Sure, you'll need to wear a jacket, but people-watching even throughout the early evening hours has the scent of summer that nobody wants to get rid of.

I'm feeling the same about cooking; while I'm starting to get excited about all the fall recipes and the cinnamon, pumpkin, and nutmeg that go along with them, I secretly long for lemonade and barbecue at the beach. When I had to plan dinner for two a few weeks ago, a barbecue at the beach is exactly what came to mind, in the form of all-American pulled pork sandwiches. Unfortunately, I don't have any red plastic baskets or sticky plastic glasses to go along with them, but it didn't stop my quest for an authentic pulled pork recipe...without a barbecue.


Ugly picture, Good food.

Slow-cooker recipes abound, but as usual, a small studio apartment doesn't really allow those kinds of folies. However, I have a great crockpot-type dish from DeBuyer that can go in and out of the oven--this was to be the stage of my pulled pork experience. I searched high and low for a good recipe, finding one with 500 comments on allrecipes.com. By the way, I always wonder how it must feel to have a near-perfect rating for your recipe and over 500 comments. Probably makes you want to write a cookbook, doesn't it?

Anyway, the recipe was for slow-cooker pulled pork, so I simply adapted it to oven cooking with my faitout. I went over to Monoprix to find "palette de porc", basically Boston butt, then to the anglo food store at République to get root beer and molasses, came home with said ingredients AND a 3 Musketeers bar, and was set to go.

One thing I forgot to mention is that the pork cooks in the root beer for approximately four hours (given the amount of pork I was cooking). And unfortunately for me, I strongly dislike root beer. My apartment being the size it is, there isn't really a way to close any door except the front door to stop the root beer smell from lingering all over the place. I put up with it, and was more than happy to find that my pork was as tender as could be and came apart without any effort at all. Once my batch of barbecue sauce was ready, I added it to the drained pork and put the crockpot on the stove, at low temp, for the remaining couple of hours.

Obviously, a pulled pork sandwich is nothing without an accompaniement. Toasted buns, a creamy yogurt coleslaw, and delicious chips were all that was needed.

I debated on whether I should buy sand and cover the floor to get that true barbecue feel, but honestly, my pulled pork meal had enough Summer infused in it.

Who needs an early Fall when you can have an endless Summer?


Oven-Cooked Pulled Pork Sandwiches
adapted from allrecipes.com serves 6

800g palette de porc, or Boston Butt
1 can root beer
Barbecue Sauce (see below)
6 toasted buns--brioche-type is best, but I used hamburger in a pinch.

Preheat oven to 130°C.
Cut large pieces of fat off the pork before cooking. Set pork in an oven-proof crockpot or faitout, and cover with can of root beer. Place lid on the dish and cook for approximately four hours.

Once pork is cooked--it should have gone from a light to a semi-dark color--drain and place pork back into the faitout. Using a fork, shred meat.
Pour barbecue sauce into the dish and mix with pork, covering and placing back into the oven for another hour.
(I started a little early, so ended up placing my faitout on the stove on low for another hour or so.)

Serve immediately with toasted buns and a side of coleslaw.


Barbecue Sauce
adapted from Cook's Illustrated makes 1 1/2 cups

1 cup ketchup
5 TB molasses
2 TB red-wine vinegar
2 TB Worcestershire sauce
2 TB Dijon mustard
1 TS hot pepper sauce
1/4 TS ground black pepper
2 TB vegetable oil
1 med garlic clove, minced
1 TS chili powder
1/4 TS cayenne pepper

Whisk ketchup, molasses, vinegar, Worcestershire, mustard, hot pepper sauce and pepper together in medium bowl.

Heat oil in saucepan over medium heat until simmering. Add garlic, chili powder and cayenne, cook until fragrant, about 30 seconds. Whisk in ketchup mixture and bring to boil, reduce heat to med-low and simmer gently, uncovered, until sauce is thickened, about 25 minutes. Cool sauce to room temperature before using. (Sauce can be refrigerated in airtight container for up to 1 week.)


Modified Coleslaw

1 green cabbage, shredded
1 large carrot, shredded
2 ribs celery, shredded
1/2 cup greek yogurt
1/4 cup sour cream
1 TB fresh lemon juice
1 TB red-wine vinegar
1 TB sugar
1 TB mustard
1 TS salt

Mix all ingredients for the sauce together. Add to vegetables and mix. Refrigerate for at least one hour prior to serving.


Monday, October 5, 2009

Macarons au Citron


Baking a dessert or pastry is often time consuming. There's never one step, one bowl, or one ingredient. So why do some people eat dessert in haste, as if you could just swallow the whole thing down without giving a second thought to all the ingredients you're tasting at once?

Obviously, when you're hungry and a yummy looking donut / muffin / cookie--I'll stop there, though I could pretty much include anything--is at arm's length, it's pretty easy to just go ahead and eat without thinking about anything other than the buttery goodness.

A true macaron, however, should never ever be eaten with haste. When you dig your teeth into a macaron, the top should be crunchy, with the underside of the top (that sure isn't clear) conveying a smooth almond taste. The inside of the macaron, depending on the flavor, is creamy or fruity, but always complementing the tops.

The macaron au citron, or lemon macaron (but you had that figured out), is no exception. In fact, it's always been my favorite. When you bite into it, you get the subtle tang of delicious lemons paired with the intense and smooth creaminess of the crème au citron, or lemon curd. It's an explosion of flavor in a dessert so éphémère you wish you could have hundreds more so the taste lasts longer.

Now, eating macarons is one thing. But making them yourself? You watch the oven while the tops are baking, hoping the "collerette" (the little frilly thing around them) suddenly appears. The collerette is a sure sign of good things to come, and seeing them definitely put a smile on my first-timer face. Making good macarons takes time, motivation, and an empty stomach when they're finally ready. You won't eat one or two. No way, you spent all day making them, so at least have five or six as a sort of payback.


Also, make sure everyone who has a taste goes on and on about how good they are. After all that work in the kitchen, basking in some kind of praise is like taking a long bath. Or having as many macarons as you could possibly want.


Macaron Citron by Pierre Hermé
makes approx. 72 macarons

Ingredients (sorry about the ingredients in grams, but there are some great Internet converters out there!)

for macaron tops:
300g almond powder
300g confectioner's sugar
110g "liquified" egg whites (placed in a bowl and put in the fridge for at least 72 hours before use)
0,5g golden yellow food coloring
10g lemon yellow food coloring
+
300g granulated sugar
75g mineral water
110g "liquified" egg whites

for lemon curd:
225g eggs
240g granulated sugar
8g Menton lemon zest (Menton lemons are impossible to find in the US, use organic lemons instead)
160g fresh lemon juice
350g high-quality butter
100g almond powder

- A day prior to making the macarons, prepare lemon curd. Rince and dry lemons before grating them. Rub zest and granulated sugar together with both hands.

- Mix lemon juice, zest/sugar, and eggs together in a bowl. Place bowl over a pan of simmering water. Beat until mixture is up to 83-84°C. Let it come back down to 60°C, and add butter cut into pieces. Beat until curd is smooth, and beat with a stand mixer for another 10 minutes.

- Pour curd in a large, shallow dish. Cover with plastic wrap, pressing it onto the curd. Store in fridge.

-The next day, sift confectioner's sugar and almond powder together. Add food coloring to the first bowl of "liquified" egg whites and mix. Pour onto the sugar-almond mixture, without mixing them together.

- Bring water and sugar to a boil, 118°C. When the syrup reaches 115°C, start beating second batch of egg whites with a stand mixer. Pour syrup onto the whites (which should be at soft peak stage by now), continue beating and wait until mixture is down to 50°C before incorporating it into the sugar/almonds mixture.

- Pipe mixture onto a parchment paper-covered baking sheet, making round shapes approx. 3,5cm in diameter. Space them approximately 2cm apart from one another.

- Tap baking sheet on kitchen counter, and let macaron tops crust for at least 30 minutes. Preheat oven to 180°C / 350°F. Bake tops for 12 minutes, opening oven door twice. After removing them from the oven, place parchment paper on counter or table.

- Mix lemon curd with the remaining almond powder. Pipe onto half of the macaron tops, covering them with the remaining tops.

- Place macarons in the fridge for 24 hours, bringing them back to room temperature for 2 hours before eating.


I seriously recommend getting Pierre Hermé's book on macarons: it has a great step-by-step of how to make them perfect, and following all the instructions apparently pays off! You can get it here, but I couldn't find it in English--maybe it hasn't been translated yet?